
- Goals and motivations
- Package an AutoIt application and create a Windows installer
- Use a Windows batch to control installer generation
- Step 1/7 : create output directory
- Step 2/7: AutoIt compilation of the main program
- Step 3/7: Copy assets
- Step 4/7: Create a file with metadatas of generation
- Step 5/7: Creating the zip archive
- Step 6/7: Creating the Windows Installer via InnoSetup
- Step 7/7: Clean by deleting the temporary directory
- Use a Windows batch to control installer generation
- Features of Windows installer with AGS and InnoSetup
- Support internationalization (i18n)
- Check if application is already install ?
- Configure additional messages in the setup : license agreement, prerequisites & history project
- Add icons into Windows start menu
- Launch command after the end of the installation
- Customize and change the graphic elements of the Windows installer
- Source code
Goals and motivations
When you just wrapped up an application, and we have executable code, you need to find a way to properly package, easy deploy to insall your application on end user machines. The first natural approch is to create a simple archive zip file of your project. But it’s not sufficient, if you want to benefit from all the features of a Windows installer.
So in order to facilitate the deployment of a Windows desktop application, AGS is proposed to build a Windows installer with the solution InnoSetup.
Package an AutoIt application and create a Windows installer
To prepare a package and generate an installer, the main steps are:
- Assign a version number to the application and configure the scripts wich create package and generate Windows installer.
- Compile the application via the main entry point myApplication.au3 with theaut2exe compiler;
- Copy the assets (images, files …) necessary for the proper functioning of the application in the output directory;
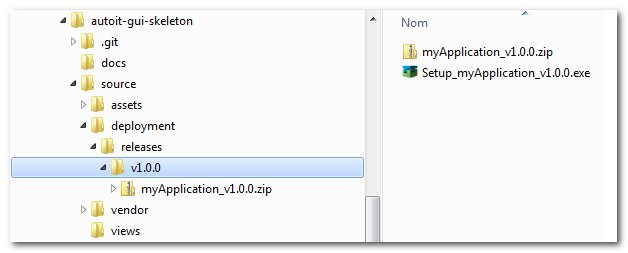
- Create a zip archive to recover the application;
- And finally build the installer by compiling the associated InnoSetup script.
All steps, to package the application and generate the installer, can be driven from a Windows batch, for obvious reasons of replayability and ease.
Use a Windows batch to control installer generation
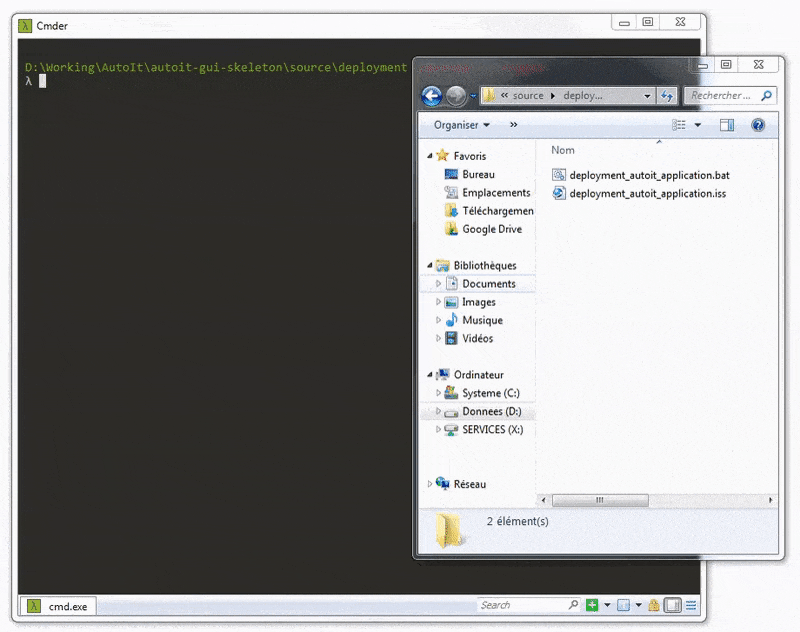
In AGS we use a Windows batch file, called AGS-deployment-setup.bat, which plays the role of orquestrian leader. In the \Deployment directory, it will create the \releases\vx.y.z\ directories where the application zip archive and the Windows installer will be built.
To do this, it will follow the following seven steps:
Step 1/7 : create output directory
Before the batch execution, it is necessary to set different variables use int this process of package creation:
| Variable | Description |
|---|---|
%VERSION% |
Version assigned to the application. |
%NAME_PROJECT% |
Used to name the executable of the application. Note that the version number also appears in the executable name. |
%AUT2EXE_AU3% |
The name of the main AutoIt file (myApplication.au3) |
%AUT2EXE_ICON% |
The application icon (%FOLDER_SRC%\assets\images\myApplication.ico) |
%ZIP_CLI% |
Path of the 7zip binary to create an archive ("C:\Program Files\7-Zip\7z.exe"). I advise you to install it via the manager Chocolatey. |
%ISCC_CLI% |
InnoSetup compiler binary path ("C:\Program Files (x86)\Inno Setup 5\ISCC.exe "). I advise you to install it via the manager Chocolatey. |
From these variables, it will build the output directory, in which the main AutoIt file will compile: .\Releases\v1.0.0\myApplication_v1.0.0 \.
Step 2/7: AutoIt compilation of the main program
The main AutoIt program is compiled from the command line with the aut2exe binary. Warning, it is necessary that this last one is to inform in the variable of environment PATH of the operating system.
:: deployment_autoit_application.bat ::

(...)

set AUT2EXE_ARGS=/in "%FOLDER_SRC%\%AUT2EXE_AU3%" /out "%FOLDER_OUT%\%NAME_EXE%" /icon
aut2exe %AUT2EXE_ARGS%
echo Compilation AutoIt is finished.
Step 3/7: Copy assets
When the process is launch, it will copy in the output directory all assets (images, files …) necessary for the proper functioning of the application and the generation of the installer.
Step 4/7: Create a file with metadatas of generation
In order to keep the build date, we create a file named ".v%VERSION%" in the output directory. It’s possible to store in this text file any metadats need to describe this generated application.
Step 5/7: Creating the zip archive
Creating the zip archive requires that 7zip is installed on the computer and that the %ZIP_CLI% variable is correctly filled in to the binary path. The command that generates the archive is as follows:
set ZIP_CLI="C:\Program Files\7-Zip\7z.exe"

%ZIP_CLI% a -tzip %NAME_PROJECT%_v%VERSION%.zip "%NAME_PROJECT%_v%VERSION%
echo * The zip has been created.
Step 6/7: Creating the Windows Installer via InnoSetup
The script InnoSetup file .\Deployment\deployment_autoit_application.iss contains all the instructions for generating the associated Windows installer.
We pass the arguments defined in the Windows batch to the ISS script via the /dNameVariable=ValueVariable set on the command line. Thus it is sufficient to configure only once the project variables (name, version …) in the Windows batch file.
** !!! Warning !!!**
In the ISS script file, there are other variables to configure:
ApplicationPublisher,ApplicationURL,ApplicationGUID, …
set ISCC_CLI="C:\Program Files (x86)\Inno Setup 5\ISCC.exe"
set ISCC_SCRIPT=deployment_autoit_application.iss

echo * Launch compilation with iscc
%ISCC_CLI% %ISCC_SCRIPT% /dApplicationVersion=%VERSION% /dApplicationName=%NAME_PROJECT%
echo * Compilation has been finished.
Step 7/7: Clean by deleting the temporary directory
It is sufficient to keep only the Zip archive and the Windows installer at the end of the process. So the batch Windows delete temporty directory.
Features of Windows installer with AGS and InnoSetup
Support internationalization (i18n)
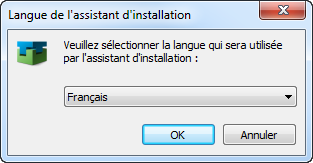
In order to add a new language, just add in the section [languages] the language provided in the compiler in the InnoSetup script file (ISS). This will translate all native messages to InnoSetup. Watch out for the YES/NO buttons in MsgBox. It is last serves forcing in the language of the operating Windows system.
[Languages]
Name: "en"; MessagesFile: compiler:Default.isl;
Name: "french"; MessagesFile: "compiler:Languages\French.isl"
In order to translate the other messages, just declare them in the section [CustomMessages], prefixing the variables with the language (en, french, nl, …). More information: http://www.jrsoftware.org/ishelp/index.php?topic=languagessection
[CustomMessages]
french.CheckInstall=est déjà installé sur ce PC.
french.CheckInstallAction=Souhaitez-vous désinstaller cette version existante avant de poursuivre?
en.CheckInstall=is already install on this PC.
en.CheckInstallAction=Do you want to uninstall this existing version before continuing?
So when starting the setup, it asks the user to choose the language he should use.
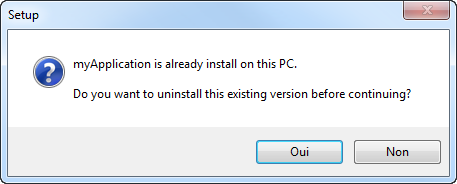
Check if application is already install ?
In order to avoid installing the application on the client computer several times, the installer checks beforehand that it is not already present.
To do this, it is based on the GUID (global unique identifier) defined in the InnoSetup script. It is important not to change the code between different application versions and that it is unique. The IDE provided by InnoSetup provides a tool to generate a new one accessible via the menu: Tools> Generate GUID inside the IDE.
; NOTE: The value of AppId uniquely identifies this application.
; Do not use the same AppId value in installers for other applications.
; (To generate a new GUID, click Tools | Generate GUID inside the IDE.)
#define ApplicationGUID "6886E28B-AAB5-4866-BCD5-E1B4C171A87A"
#define ApplicationID ApplicationName + "_" + ApplicationGUID
In addition, the installer adds the SOFTWARE\Microsoft\Windows\CurrentVersion\Uninstall\{#ApplicationID}_is1 key into the Windows registry. When the application is uninstalled, this key is removed. So we just have to check the presence of this key in the registry to know if the application has already been installed.

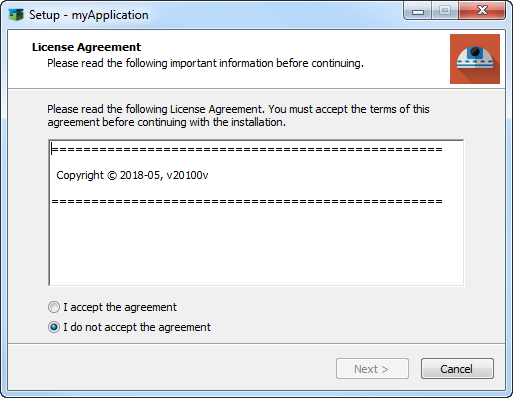
Configure additional messages in the setup : license agreement, prerequisites & history project
To configure the different messages to be displayed in the installer, including the license agreements, just fill in the text files in the ./assets/ directory.
AFTER_INSTALL.txt: usually to display the roadmap and project history;BEFORE_INSTALL.txt: usually to display the prerequisites of the application;LICENSE.txt: the license of use.
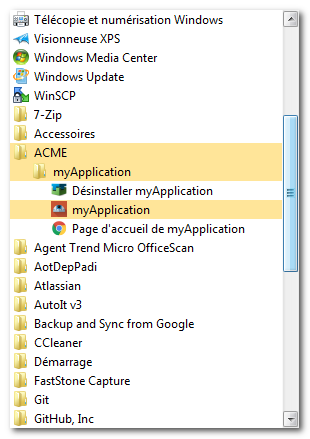
Add icons into Windows start menu
To add items to the Windows start menu, enter the [Icons] section in the InnoSetup script as follows:
[Icons]
Name: "{group}\{#ApplicationName}"; Filename: "{app}\{#ApplicationExeName}"; IconFilename: {app}\assets\images\myApplication.ico;
Name: "{group}\{cm:ProgramOnTheWeb,{#ApplicationName}}"; Filename: "{#ApplicationURL}";
Name: "{group}\{cm:UninstallProgram,{#ApplicationName}}"; Filename: "{uninstallexe}"; IconFilename: {app}\assets\images\setup.ico;
Name: "{commondesktop}\{#ApplicationName}"; Filename: "{app}\{#ApplicationExeName}"; IconFilename: {app}\assets\images\myApplication.ico; IconIndex: 0
So we have.
Launch command after the end of the installation
It’s possible to launch a command after the end of installation, like start the application.
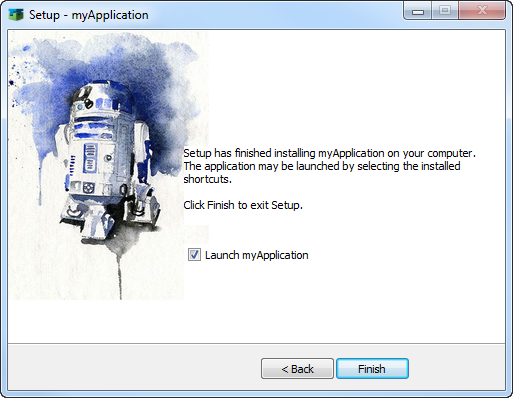
Customize and change the graphic elements of the Windows installer
We choose a static size for the installer. It’s not the easiest to choose another size.
There are 2 images and 2 icons used in the installer. They are stored in the .\Assets\images directory. The images are necessarily in the format bmp and must respect standard sizes.
| Images use in setup | File | Comments |
|---|---|---|
| UninstallDisplayIcon | .\assets\images\myApplication.ico | Must be an ico |
| SetupIconFile | .\assets\images\setup.ico | Must be an ico |
| WizardImageFile | .\assets\images\innosetup_background.bmp | Must be a 500x313 bmp image |
| WizardSmallImageFile | .\assets\images\innosetup_image.bmp | Must be a 50x50 bmp image |
Into the InnoSetup script, they are used as follows:
UninstallDisplayIcon={app}\assets\images\myApplication.ico
WizardImageFile={#PathAssets}\images\innosetup_background.bmp
WizardSmallImageFile={#PathAssets}\images\innosetup_image.bmp
SetupIconFile={#PathAssets}\images\setup.ico
Source code
Windows batch bandmaster
::------------------------------------------------------------------------------
::
::    Copyright © 2018-05
::
::    @name           : AGS-deployment-setup
::    @version        : 1.0.1
::    @AGS package    : AGS v1.0.0
::    @AutoIt version : v3.3.14.5
::    @authors        : 20100 <vb20100bv@gmail.com>
::
::------------------------------------------------------------------------------


cls
@echo off

:: Change value for this variables
set VERSION=0.9.0
set NAME_PROJECT=ApplicationWithCheckForUpdates

:: Deployment variables
set FOLDER_CURRENT=%cd%
set NAME_EXE=%NAME_PROJECT%_v%VERSION%.exe
set FOLDER_SRC=%FOLDER_CURRENT%\..\
cd %FOLDER_SRC%
set FOLDER_SRC=%cd%
set FOLDER_OUT=%FOLDER_CURRENT%\v%VERSION%\%NAME_PROJECT%_v%VERSION%

:: AutoIt compiler
Set AUT2EXE_AU3=ApplicationWithCheckForUpdates.au3
set AUT2EXE_ICON=%FOLDER_SRC%\assets\images\myApplication.ico
set AUT2EXE_ARGS=/in "%FOLDER_SRC%\%AUT2EXE_AU3%" /out "%FOLDER_OUT%\%NAME_EXE%" /icon "%AUT2EXE_ICON%"

:: Path binaries
set ZIP_CLI="C:\Program Files\7-Zip\7z.exe"
set ISCC_CLI="C:\Program Files (x86)\Inno Setup 5\ISCC.exe"
set ISCC_SCRIPT=AGS-deployment-setup.iss


echo.
echo.
echo      [  AGS-deployment-setup  ]
echo.
echo.


echo ----[ Variables for generation ]----
echo * VERSION        = %VERSION%
echo * NAME_PROJECT   = %NAME_PROJECT%
echo * FOLDER_CURRENT = %FOLDER_CURRENT%
echo * NAME_EXE       = %NAME_EXE%
echo * FOLDER_SRC     = %FOLDER_SRC%
echo * FOLDER_OUT     = %FOLDER_OUT%
echo * AUT2EXE_ICON   = %AUT2EXE_ICON%
echo * AUT2EXE_AU3    = %AUT2EXE_AU3%
echo * AUT2EXE_ARGS   = %AUT2EXE_ARGS%
echo * ZIP_CLI        = %ZIP_CLI%
echo * ISCC_CLI       = %ISCC_CLI%
echo * ISCC_SCRIPT    = %ISCC_SCRIPT%
echo -------------------------------------

echo.
echo.

echo ----[ Step 1/7 - Creating directories ]----
cd %FOLDER_CURRENT%
echo * Attempt to create : "%cd%\v%VERSION%\"
mkdir v%VERSION%
cd v%VERSION%
echo.
echo * Attempt to create : %cd%\%NAME_PROJECT%_v%VERSION%\
mkdir %NAME_PROJECT%_v%VERSION%
cd %FOLDER_CURRENT%
echo -------------------------------------

echo.
echo.


echo ----[ Step 2/7 - Launch AutoIt compilation ]----
echo * Run compilation with aut2exe and AUT2EXE_ARGS.
aut2exe %AUT2EXE_ARGS%
echo * Compilation AutoIt is finished.
echo -------------------------------------

echo.
echo.


echo ----[ Step 3/7 - Copy assets files ]----
echo * Create the file xcopy_EXCLUDE.txt in order to ignore some file and directory.
echo .au3 > xcopy_Exclude.txt
echo /releases/ >> xcopy_Exclude.txt
echo /src/ >> xcopy_Exclude.txt
echo /vendor/ >> xcopy_Exclude.txt
echo *   - ignore all .au3 files
echo *   - ignore all .pspimage files
echo * The file xcopy_EXCLUDE.txt is created.
echo.
echo * Copy additional files store in assets, config, docs directories
xcopy "%FOLDER_SRC%\assets" "%FOLDER_OUT%\assets\" /E /H /Y /EXCLUDE:xcopy_Exclude.txt
xcopy "%FOLDER_SRC%\config" "%FOLDER_OUT%\config\" /E /H /Y /EXCLUDE:xcopy_Exclude.txt
xcopy "%FOLDER_SRC%\docs" "%FOLDER_OUT%\docs\" /E /H /Y /EXCLUDE:xcopy_Exclude.txt
@copy "%FOLDER_SRC%\package.json" "%FOLDER_OUT%\package.json" /Y > log
echo "%FOLDER_SRC%\package.json" is copied.
@copy "%FOLDER_SRC%\README.md" "%FOLDER_OUT%\README.md" /Y > log
echo "%FOLDER_SRC%\README.md" is copied.
echo * Ok all files and directory are copied.
echo.
echo * Delete xcopy_Exclude.txt.
del xcopy_Exclude.txt
del log
echo -------------------------------------

echo.
echo.


echo ----[ Step 4/7 - Create additional files ]----
echo * Create file ".v%VERSION%" in FOLDER_OUT.
cd %FOLDER_OUT%
echo Last compilation of application %NAME_PROJECT% version %VERSION% the %date% at %time% > .v%VERSION%
echo * This file has been created.
echo -------------------------------------

echo.
echo.


echo ----[ Step 5/7 - Create zip archive ]----
echo * Move in the folder %FOLDER_CURRENT%\v%VERSION%
cd %FOLDER_CURRENT%\v%VERSION%
echo * Zip the folder %NAME_PROJECT%_v%VERSION%
%ZIP_CLI% a -tzip %NAME_PROJECT%_v%VERSION%.zip "%NAME_PROJECT%_v%VERSION%
echo * The zip has been created.
echo -------------------------------------

echo.
echo.

echo ----[ Step 6/7 - Make setup with InnoSetup command line compilation ]----
cd %FOLDER_CURRENT%
echo * Launch compilation with iscc
%ISCC_CLI% %ISCC_SCRIPT% /dApplicationVersion=%VERSION% /dApplicationName=%NAME_PROJECT%
echo.
echo * Compilation has been finished.
echo -------------------------------------

echo.
echo.

echo ----[ Step 7/7 - Delete temp folder use for ISS compilation ]----
cd %FOLDER_CURRENT%
echo * Delete the folder %FOLDER_CURRENT%\v%VERSION%\%NAME_PROJECT%_v%VERSION%\
rmdir %FOLDER_CURRENT%\v%VERSION%\%NAME_PROJECT%_v%VERSION% /S /Q
echo -------------------------------------

echo.
echo.

cd %FOLDER_CURRENT%
echo ----[ End process ]----
echo.
InnoSetup Script (ISS) associated
;---------------------------------------------------------------------------------
;
;    Copyright © 2018-05, v20100v
;
;    @author    v20100v
;    @contact   7567933+v20100v@users.noreply.github.com
;    @version   1.0.0
;
;---------------------------------------------------------------------------------

; ApplicationVersion : the version number is defined by InnoSetupCommandLineCompiler (iscc) with /d<name>[=<value>]	(/dApplicationVersion=0.3.6.5)
; ApplicationName : the name of applciation is defined by InnoSetupCommandLineCompiler (iscc) with /d<name>[=<value>]	(/dApplicationName=MyApplication)

#define ApplicationPublisher "v20100v"
#define ApplicationURL "https://github.com/v20100v/autoit-gui-skeleton"
#define ApplicationExeName ApplicationName+"_v" + ApplicationVersion + ".exe"
#define ApplicationCopyright "Copyright (C) 2018, A.C.M.E v20100v"

; Get the path where the script iss is placed
#define PathRelease SourcePath + "releases\v" + ApplicationVersion + "\"+ApplicationName+"_v" + ApplicationVersion
#define PathOutput SourcePath + "releases\v" + ApplicationVersion + "\"
#define PathAssets SourcePath + "..\assets"

; NOTE: The value of AppId uniquely identifies this application.
; Do not use the same AppId value in installers for other applications.
; (To generate a new GUID, click Tools | Generate GUID inside the IDE.)
#define ApplicationGUID "6886E28B-AAB5-4866-BCD5-E1B4C171A87A"
#define ApplicationID ApplicationName + "_" + ApplicationGUID

[Setup]
; NOTE: The value of AppId uniquely identifies this application.
; Do not use the same AppId value in installers for other applications.
; (To generate a new GUID, click Tools | Generate GUID inside the IDE.)
AppId={#ApplicationID}
AppName={#ApplicationName}
AppVersion={#ApplicationVersion}
AppPublisher={#ApplicationPublisher}
AppPublisherURL={#ApplicationURL}
AppSupportURL={#ApplicationURL}
AppUpdatesURL={#ApplicationURL}
AppCopyright={#ApplicationCopyright}
DefaultDirName={sd}\ACME\{#ApplicationName}
DefaultGroupName=ACME\{#ApplicationName}
LicenseFile={#PathAssets}\LICENSE.txt
InfoBeforeFile={#PathAssets}\BEFORE_INSTALL.txt
InfoAfterFile={#PathAssets}\AFTER_INSTALL.txt
OutputDir={#PathOutput}\
OutputBaseFilename=Setup_{#ApplicationName}_v{#ApplicationVersion}
Compression=lzma2/fast
SolidCompression=yes
AppContact=7567933+v20100v@users.noreply.github.com
UninstallDisplayIcon={app}\assets\images\myApplication.ico
WizardImageFile={#PathAssets}\images\innosetup_background.bmp
WizardImageStretch=no
WizardSmallImageFile={#PathAssets}\images\innosetup_image.bmp
SetupIconFile={#PathAssets}\images\setup.ico
BackColor=$FFFF00
VersionInfoVersion={#ApplicationVersion}

; Make this setup program work with 32-bit and 64-bit Windows
ArchitecturesAllowed=x86 x64
ArchitecturesInstallIn64BitMode=x64


[Languages]
Name: "en"; MessagesFile: compiler:Default.isl;
Name: "french"; MessagesFile: "compiler:Languages\French.isl"

[CustomMessages]
french.CheckInstall=est déjà installé sur ce PC.
french.CheckInstallAction=Souhaitez-vous désinstaller cette version existante avant de poursuivre?
en.CheckInstall=is already install on this PC.
en.CheckInstallAction=Do you want to uninstall this existing version before continuing?

[Tasks]
Name: "desktopicon"; Description: "{cm:CreateDesktopIcon}"; GroupDescription: "{cm:AdditionalIcons}";

[Files]
Source: "{#PathRelease}\{#ApplicationExeName}"; DestDir: "{app}"; Flags: ignoreversion
Source: "{#PathRelease}\*"; DestDir: "{app}"; Flags: ignoreversion recursesubdirs createallsubdirs

[Icons]
Name: "{group}\{#ApplicationName}"; Filename: "{app}\{#ApplicationExeName}"; IconFilename: {app}\assets\images\myApplication.ico;
Name: "{group}\{cm:ProgramOnTheWeb,{#ApplicationName}}"; Filename: "{#ApplicationURL}";
Name: "{group}\{cm:UninstallProgram,{#ApplicationName}}"; Filename: "{uninstallexe}"; IconFilename: {app}\assets\images\setup.ico;
Name: "{commondesktop}\{#ApplicationName}"; Filename: "{app}\{#ApplicationExeName}"; IconFilename: {app}\assets\images\myApplication.ico; IconIndex: 0

[Run]
Filename: "{app}\{#ApplicationExeName}"; Description: "{cm:LaunchProgram,{#StringChange(ApplicationName, '&', '&&')}}"; Flags: shellexec postinstall skipifsilent

[Registry]
Root: HKCR; Subkey: {#ApplicationName}Application; ValueType: string; ValueName: ; ValueData: Program {#ApplicationName}; Flags: uninsdeletekey
Root: HKCR; Subkey: {#ApplicationName}Application\DefaultIcon; ValueType: string; ValueName: ; ValueData: {app}\{#ApplicationExeName},0; Flags: uninsdeletevalue
Root: HKCR; Subkey: {#ApplicationName}Application\shell\open\command; ValueType: string; ValueName: ; ValueData: """{app}\{#ApplicationExeName}"" ""%1"""; Flags: uninsdeletevalue

[Code]
function InitializeSetup(): Boolean;
var
  ResultCode: Integer;
  ResultStr:string;
begin
  // Check if the application is already install
  // MsgBox('ApplicationID = ' + '{#ApplicationID}', mbInformation, mb_Ok);
  begin
    If RegQueryStringValue(HKLM, 'SOFTWARE\Microsoft\Windows\CurrentVersion\Uninstall\{#ApplicationID}_is1', 'UninstallString', ResultStr) then begin
      If ResultStr<>'' then begin
        ResultStr:=RemoveQuotes(ResultStr);
          if MsgBox('{#ApplicationName} ' + ExpandConstant('{cm:CheckInstall}') + #13#13 + ExpandConstant('{cm:CheckInstallAction}'), mbConfirmation, MB_YESNO) = idYes then
          if not Exec(ResultStr, '/silent', '', SW_SHOW, ewWaitUntilTerminated, ResultCode) then
            MsgBox('Erreur !!! ' #13#13 '' + SysErrorMessage(ResultCode) + '.', mbError, MB_OK);
      end;
    end;
  end ;
  Result := True;
end;

procedure InitializeWizard();
var
  WLabel1, WLabel2 : TLabel;
begin
  WizardForm.WelcomeLabel1.Hide;
  WizardForm.WelcomeLabel2.Hide;
  WizardForm.FinishedHeadingLabel.Hide;

  WizardForm.WizardBitmapImage.Width := 500;
  WizardForm.WizardBitmapImage.Height := 315;

  WLabel1 := TLabel.Create(WizardForm);
  WLabel1.Left := ScaleX(176);
  WLabel1.Top := ScaleY(16);
  WLabel1.Width := ScaleX(301);
  WLabel1.Height := ScaleY(54);
  WLabel1.AutoSize := False;
  WLabel1.WordWrap := True;
  WLabel1.Font.Name := 'tahoma';
  WLabel1.Font.Size := 12;
  WLabel1.Font.Style := [fsBold];
  WLabel1.Font.Color:= clBlack;
  WLabel1.ShowAccelChar := False;
  WLabel1.Caption := WizardForm.WelcomeLabel1.Caption;
  WLabel1.Transparent := True;
  WLabel1.Parent := WizardForm.WelcomePage;
  WLabel1.Hide;

  WLabel2 :=TLabel.Create(WizardForm);
  WLabel2.Left := ScaleX(176);
  WLabel2.Top := ScaleY(136);
  WLabel2.Width := ScaleX(301);
  WLabel2.Height := ScaleY(234);
  WLabel2.AutoSize := False;
  WLabel2.WordWrap := True;
  WLabel2.Font.Name := 'tahoma';
  WLabel2.Font.Color:= clBlack;
  WLabel2.ShowAccelChar := False;
  WLabel2.Caption := WizardForm.WelcomeLabel2.Caption;
  WLabel2.Transparent := True;
  WLabel2.Parent := WizardForm.WelcomePage;

  WizardForm.WizardBitmapImage2.Width := 500;
  WizardForm.WizardBitmapImage2.Height := 315;

  WizardForm.FinishedLabel.Left := ScaleX(176);
  WizardForm.FinishedLabel.Top := ScaleY(116);
end;

procedure CurPageChanged(CurPageID: Integer);
begin
  // you must do this as late as possible, because the RunList is being modified
  // after installation; so this will check if there's at least one item in the
  // RunList and then set to the first item (indexing starts at 0) Enabled state
  // to False
  if (CurPageID = wpFinished) then
    //WizardForm.RunList.Visible := False;
    WizardForm.RunList.Left := ScaleX(176);
    WizardForm.RunList.Top := ScaleY(214);
end;
Relating reading